Rowscope usage
GUI description
The follwing picture describes each part of the GUI:

How to view a file
This is how you view a file
with Rowscope:
- Choose the path of the file
you want to view, either by:
- Selecting it from the list of previously opened files.
- Choosing it with the "..." button, that opens an "Open File" dialog.
- Writing it directly in the File text box.
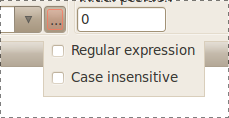
- Enter the search text.
The text can be a simple text or a regular expression, which can be
decided pressing the "..." button, which discloses the search option
panel:
The search text is used to filter the rows read from the file. Only the rows matching the search text are
displayed in the table.
By default the search text is intended as simple and the search
is case sensitive. This means that only the rows that contain exactly
the search text will be part of the result.
Selecting the Regular expression
check box Rowscope uses the search text as a regular expression. This
means that only the rows that contain a text that matches the regular
expression will be part of the result.
Selecting the Case insensitive
check box the search becomes case insensitive. This means that, both in
the case of a simple search and regular expression search, the case of
the letters does not influence the search.
If the search text is empty, virtually all rows of the file are
displayed in the table. However, to avoid filling up memory, only the
first 1000 rows reasulting from the search are displayed in the table.
So, if you don't know what the file contains, it is a good idea to
leave the search text empty. In this way you read the first 1000 rows
of the file. From these rows you can understand the structure of the file and find a good search text to search
again.
- You can read the file from the start or instead read only the
rows from a certain initial position. This can be useful if you already know where the interesting parts of the file are located.
Pressing the Load button or
pressing Enter in one of the file
path, search text or initial position text boxes, the
file gets loaded in the viewer. Only the rows matching the search text
are displayed in the table.
Press the Stop button to stop
the file loading.
Once the table has been filled with 1000 lines, the file stops loading.
To start again to populate the table, press More.
Rows expansion
Once the loading process is started, and the rows start to appear in
the table, you have a starting point to investigate.
If you select one row in the table, a set of buttons appear at the start of the row:

With these buttons you can expand the row.
To expand a row means to display
in the table the rows immediately preceding
or following the selected row in the file.
If you expand the row backward (preceding rows), the resulting rows
appear with a red background (by default) in
the line number column.
If you expand the row forward (following rows), the resulting rows
appear with a green background
(by default) in the line number column.
The original row that got expanded gets a blue background (by default) in the line number column.
Red, green and blue colors can be changed in the Options Dialog.
You can expand a row several times, displaying more of the preceding
and following rows.
You can also select in the expansion text box how many rows you want to display
every time you press the expansion button.
Other actions
Once you have some rows in the table, you can also:
- Double-click a row in the table and show it entirely
in a dialog box. In fact, to avoid memory and performance problems, at most 255 characters of each row are
displayed in the table. But when you show it in the dialog
box, the row is complete:

- View the same file in a new tab, but starting from the current row (the last button of the row buttons).
- Copy the selected rows in
the table to the clipboard.
Tabs
Rowscope allows to view more than one file, using a tab interface. Pressing the + button by the last tab on the top of the window you open a viewer for a new file.
Options
On the top right corner there is the System menu. From there you can show the help web page (this document) and open the Options Dialog.
The Options Dialog controls the behaviour of the whole Rowscope (not only a single file viewer):
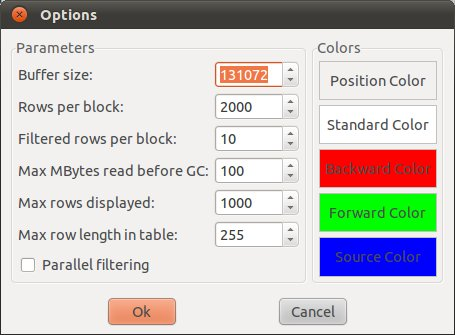
The options have a tooltip text that explain what they are.
Changes on these options are visible only to the file viewers opened after they have been changed.
Parallel filtering
One of the options, called parallel filtering, uses the fork-join framework to distribute the rows filtering (using search text or regular
expression) on several cores, making the search "parallel".
This option is by default unchecked, because it is not sure it improves the performance. This depends by several factors:
- the number of cores available on the PC. They should be at least more than 2.
- the Rows per block option,
which determines the length of the array that gets distributed. A too
small array (< 1000 ?) makes the parallelization ineffective;
but the bigger is the array, the heavier is the load on the file reader
and higher the memory consumption.
- the usage of the cores by other applications and by Rowscope
itself: the threads (actors) of Rowscope can be distributed on several
cores.
So if you want to use this option test it and see if you get some performance improvements.